No-Bake Salted Caramel Cheesecake Cups (Easy Party Dessert)
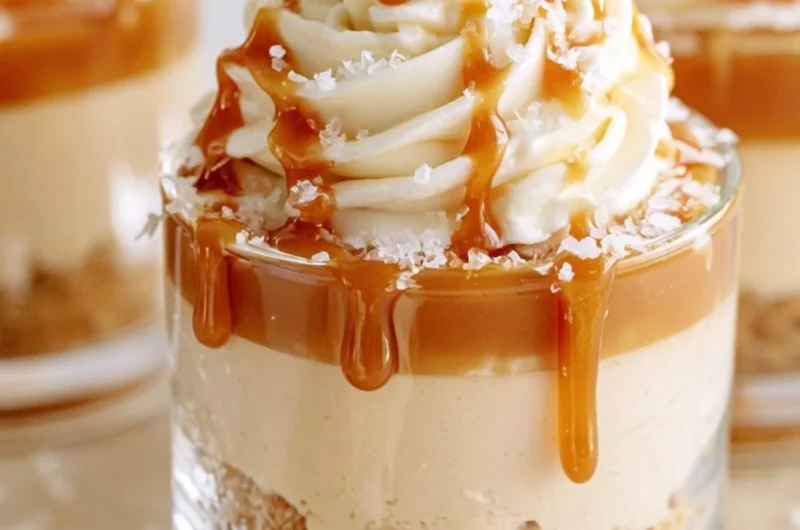
There’s something truly magical about desserts that require no baking. They are like the warm hugs of the culinary world—simple, comforting, and always inviting. Today, I’m thrilled to share a recipe that has quickly become a cherished favorite in my home: No-Bake Salted Caramel Cheesecake Cups. These creamy, decadent cups are perfect for any occasion, serving as a sweet reminder of lazy summer evenings or festive holiday gatherings. With every bite, the smooth cheesecake mingles perfectly with the rich caramel, leaving you with that delightful combination of sweet and salty. This is one you’ll definitely want to pin for later!
Why You’ll Love This Recipe
- Quick and Easy: As an easy party dessert, you can whip these up in a flash, giving you more time to enjoy with your friends and family.
- No-Bake Delight: No need to turn on the oven! These cups come together effortlessly, making them ideal for warm days.
- Crowd-Pleasing Flavors: The combination of creamy cheesecake and sweet caramel is always a winner at gatherings.
- Customizable: Personalize these cups with your favorite toppings or mix-ins for a unique twist.
- Family-Friendly: A treat that both kids and adults will love—perfect for any family gathering!
Ingredients You’ll Need for No-Bake Salted Caramel Cheesecake Cups (Easy Party Dessert)
- 8 oz cream cheese, softened
- 1/2 cup powdered sugar
- 1 cup heavy whipping cream
- 1 teaspoon vanilla extract
- 1/2 cup caramel sauce
- 1/4 teaspoon sea salt
- 1 cup cookie crumbs (like graham crackers or Oreos)
- 3 tablespoons unsalted butter, melted
How to Make No-Bake Salted Caramel Cheesecake Cups (Easy Party Dessert)
- In a bowl, mix the cookie crumbs with melted butter until combined. Spoon the mixture into the bottom of serving cups and press down to form a crust.
- In another bowl, beat the cream cheese and powdered sugar until smooth and creamy.
- In a separate bowl, whip the heavy cream until stiff peaks form, then fold it into the cream cheese mixture gently to keep it light and airy.
- Add vanilla extract and 1/4 cup of caramel sauce, then mix together gently until well incorporated.
- Spoon the cheesecake mixture into the cups over the cookie crust, filling them up nicely.
- Drizzle the remaining caramel sauce on top and sprinkle with a pinch of sea salt for an extra burst of flavor.
- Refrigerate the cups for at least 2 hours before serving to allow those flavors to meld beautifully.
Delicious Variations to Try
- Chocolate Indulgence: Fold in some mini chocolate chips for a rich, chocolaty twist that adds both flavor and texture.
- Fruitful Fun: Top each cup with fresh berries like strawberries or blueberries for a fruity contrast that brightens up the flavor.
- Nutty Delight: Add crushed nuts as a topping for a crunchy element that complements the creamy and soft texture of the cheesecake.
- Cocoa Crunch: Substitute half of the cookie crumbs with cocoa powder-flavored cookies for a different taste experience.
Chef Emma’s Helpful Tips
- Make-Ahead Magic: These cheesecake cups can be made a day in advance. Just keep them covered in the fridge until you’re ready to serve.
- Ingredient Swaps: You can easily swap the cream cheese for mascarpone cheese for a richer, creamier flavor.
- Storing Leftovers: If you happen to have any leftovers, store them in an airtight container in the fridge for up to 3 days for the best flavor.
- Serving Style: For a fun presentation, consider using mason jars instead of cups—your guests will love the rustic touch!
Nutrition Information per Serving
- Serving Size: 1 cup
- Calories: 350
- Carbohydrates: 27g
- Sugar: 22g
- Fat: 25g
- Protein: 4g
- Sodium: 140mg
Frequently Asked Questions
- Can I make this ahead? Yes! Make them up to a day in advance and store in the fridge.
- Can I use different ingredients? Absolutely! Feel free to swap the crust or use a different flavored cream cheese.
- How do I store leftovers? Keep any leftovers in an airtight container in the refrigerator for up to 3 days.
- How long does it last? They are best enjoyed within a few days for the freshest flavor.
Final Thoughts
These No-Bake Salted Caramel Cheesecake Cups are not just a dessert; they are a celebration of flavors that bring joy and comfort to any gathering. The creamy texture and delightful sweetness, paired with a hint of salt, make them a truly special treat. So, gather your loved ones around and let these charming cups enlighten your dessert table. Save this No-Bake Salted Caramel Cheesecake Cups (Easy Party Dessert) to your Pinterest board so it’s ready when you need a cozy treat!
Print
No-Bake Salted Caramel Cheesecake Cups
- Total Time: 135 minutes
- Yield: 4 servings 1x
- Diet: Vegetarian
Description
Delicious no-bake cheesecake cups with creamy filling and rich salted caramel, perfect for any occasion.
Ingredients
- 8 oz cream cheese, softened
- 1/2 cup powdered sugar
- 1 cup heavy whipping cream
- 1 teaspoon vanilla extract
- 1/2 cup caramel sauce
- 1/4 teaspoon sea salt
- 1 cup cookie crumbs (like graham crackers or Oreos)
- 3 tablespoons unsalted butter, melted
Instructions
- Mix the cookie crumbs with melted butter until combined. Spoon the mixture into the bottom of serving cups and press down to form a crust.
- Beat the cream cheese and powdered sugar in another bowl until smooth and creamy.
- Whip the heavy cream in a separate bowl until stiff peaks form, then fold it into the cream cheese mixture gently.
- Add vanilla extract and 1/4 cup of caramel sauce, then mix together gently until well incorporated.
- Spoon the cheesecake mixture into the cups over the cookie crust, filling them nicely.
- Drizzle the remaining caramel sauce on top and sprinkle with a pinch of sea salt.
- Refrigerate the cups for at least 120 minutes before serving to allow flavors to meld beautifully.
Notes
These cups can be made a day in advance and stored in the fridge. Substitute cream cheese with mascarpone for a richer flavor.
- Prep Time: 15 minutes
- Cook Time: 0 minutes
- Category: Dessert
- Method: No-Bake
- Cuisine: American
Nutrition
- Serving Size: 1 cup
- Calories: 350
- Sugar: 22g
- Sodium: 140mg
- Fat: 25g
- Saturated Fat: 15g
- Unsaturated Fat: 8g
- Trans Fat: 0g
- Carbohydrates: 27g
- Fiber: 1g
- Protein: 4g
- Cholesterol: 60mg